10/15/2011
Our First Press Today
We are going to pressing the Merlot today. If you are out touring wine country today, stop by to see the first grapes of 2011 get pressed and enjoy some wine and wood-fired pizza too!
10/12/2011
Two more Pizza Saturdays
We will be firing up the pizza oven just two more times this season. Come out and join us Saturday, October 15 and Saturday, October 29 when Chris will be cooking up some of his wood fired pizzas.
10/11/2011
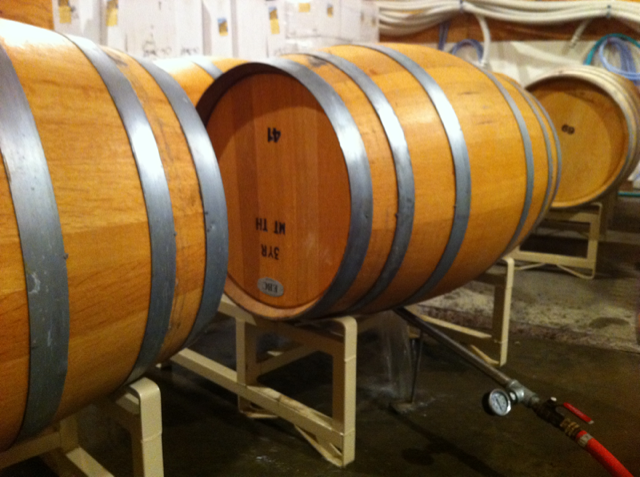
The Reds are Fermenting


10/01/2011
Fire burns off our Shrub Steppe land

8/25/2011
Pizza this Saturday
We will have the pizza oven going again this weekend. Stop by Saturday August 27 for some of those great pizzas and a glass of wine under the shade trees at Steppe Cellars.
Blending Wine
Anke, Neil and Tom have all been busy getting wines blended and ready for bottling next week.
7/29/2011
A Beautiful Wedding

Congratulations to Ben and Okeyse! A beautiful wedding, a fun party & a great time had by all. Thank you for letting us be a part of your special day!


3/28/2011
Pizza Oven...Fired
So after the last posting I put the oven inside to keep the rain off and allow the clay to begin to dry out. There is a lot of clay with a lot of moisture in it so I gave it several days. Once the clay was pliable but firm I began scooping the sand out from inside the clay form. This process took a little while and had to be carefully done to prevent damage to the oven itself.


Once the csand was out I began slowly heating the inside of the oven to begin seriously drying the clay. Again I wanted this to be a slow process so as not to crack anything (if the clay dried really quickly and shrank unevenly I worried the big dome would collapse) I couldn't get a fire going using wood because there was so much moisture inside the oven. I used a propane torch on low for several days. This provided a nice distractions from farm and winery chores, "sorry dad I need to go check on the oven", was probably a little overused by the end of the week.

Today it was dry enough to get a wood fire going on its own. I fired the oven for about two hours and go it really hot...probably close to at least 600 degrees F. I think it will get hotter after it finishes drying. There was still quite a bit of moisture in the oven when I was firing it.
 Once the oven was up to temp, I swept the floor, pushed the fire to the back of the dome and cooked a pizza. It was a pretty big relief to see the thing work after all that effort. Hopefully this will be a nice addition to the winery.
3/23/2011
Wood Fired Pizza Oven Part 3
So I got started on the thermal layer of the oven today. The first step here was to get all the building materials together. I have a spot on the farm that has almost pure clay, which is great. However, as it is a desert, the clay is pretty dry and compacted. As seen below.
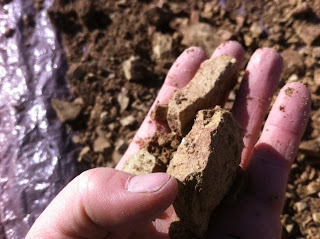 My solution involved running over it with a forklift...an elegant solution. Most of my problem solving is in this vein.
 What I was left with was a nice crushed clay building material. I mixed this with about twice its weight of sand. Clay expands with water and then shrinks when that water/clay dries. I need to keep the oven from shrinking and cracking...too much. Sand doesn't shrink when it dries out so it is a good choice for blending with clay.
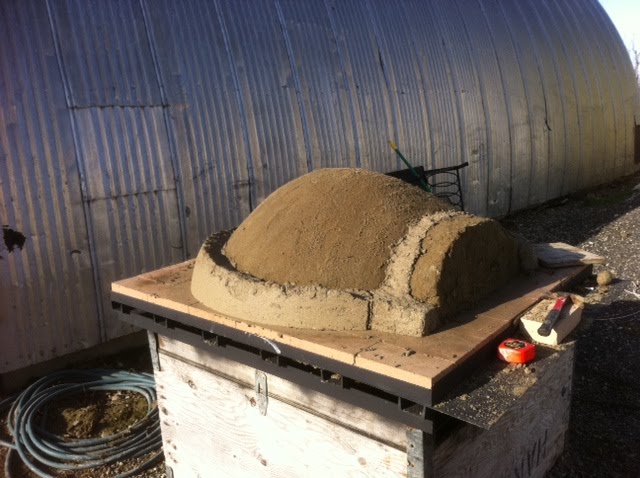
 The next step is start packing the mud/clay/sand around the prepared sand form. This is a very slow job. You have to be very careful to not break the sand form, not leave any air pockets, and keep the mud layer about 4 inches wide.
8AM

 My solution involved running over it with a forklift...an elegant solution. Most of my problem solving is in this vein.
 What I was left with was a nice crushed clay building material. I mixed this with about twice its weight of sand. Clay expands with water and then shrinks when that water/clay dries. I need to keep the oven from shrinking and cracking...too much. Sand doesn't shrink when it dries out so it is a good choice for blending with clay.
 The next step is start packing the mud/clay/sand around the prepared sand form. This is a very slow job. You have to be very careful to not break the sand form, not leave any air pockets, and keep the mud layer about 4 inches wide.
 8AM

9:30 AM

10:30AM

10:40 (my arms were getting pretty tired at this point)

11:45 AM

After the form dries ("leather" hard for the potters in the crowd) it will shrink a little bit bit but will firm up quite a bit. After a couple of days I will clean up the door opening and cut a chimney. After that we will fire it up and fire off a couple of pizzas. Just to be sure it works before I make it look pretty.
3/18/2011
Mobile Wood Fired Pizza Oven part 2
So I did some more work on the oven today. I set the last of bricks into the forklift-able steel base. The last few bricks took quite a bit of convincing to get seated properly. I think that bricks are very secure in there home now though.
The next step was to layout the shape of the oven on the bricks. This is to be a round domed oven. Some pizza ovens use a "barrel" style layout. The is going to be a little more all purpose than that. I marked out the circle for a 42" diameter. This should give us plenty of space for a fire and for multiple pizza's or loaves of bread.

After I had the oven chalked out I began mixing some sand and water together to get a mixture that would hold its own weight. Next a started piling the sand into the marked oven area.


Finally I shaped the sand into a dome. This dome represents the inside of the oven space. The next step will be to pack clay around the outside of the sand form.
 So the next step is going to be coming up with a clay mixture to pack around this form. After mixing 10 wheelbarrow loads of sand and water today just to get the form put together I think that I will rent a commercial mixer for the clay work...my back is kind of killing me right now.
Neil
3/17/2011
Mobile Wood Fired Pizza Oven
So we have been talking about building a mobile pizza oven to go with our farm's big barbeque for a while now. I built an oven for my house a while ago and love it. It makes for a great day after working at the winery. Go home, have a beer, play with fire for a little while and finally eat pizza. We wanted something like that at the winery but have been going around and around as to how to do it. I finally took the plunge and got started on it this week. I don't really know what I am doing here, but so far so good.
Whats the worst that can happen right?
I am trying to use as much found (not purchased) material as I can for this project. Hopefully all I will need to buy is welding rod and bricks (I have had to buy a couple of pieces of steel that I couldn't pull out of the farm's scrap bin...but hopefully that is the end of purchases!).
I am hoping to get a finished clay oven with a 43" inside cooking surface that we can pick up with a forklift and put on the back of our pig roasting trailer.
The first step was to cut a piece of steel and reinforce it with channel iron.

The next step was to lay another series of channel down for stiffening the frame in the opposite direction and to give us something to get the forklift underneath.
 After that we laid out the insulating fire bricks, which are to be the base of the oven. We then welded some angle iron on in order to hold the bricks tightly together on the top of our steel structure. I took this opportunity to shoot a little high temp engine paint on this thing so it wouldn't look quite so "rustic".

The final thing I did today was to add a fine layer of sand as a bed for our fire bricks and start the brick layout. Because our bricks are held together tightly by steel angle iron I figured it would be fine to skip the fancy patterns and just lay them seam to seam. I guess we will see how it works out.
 So that is all I have done at the moment. The next step is going to be gathering the clay and mixing it with sand to build the dome. I should be getting going with that in the next couple of days as time allows. Then on to pizza...and more importantly beer! Or wine I guess, if you know where to find any.
-Neil
Whats the worst that can happen right?
I am trying to use as much found (not purchased) material as I can for this project. Hopefully all I will need to buy is welding rod and bricks (I have had to buy a couple of pieces of steel that I couldn't pull out of the farm's scrap bin...but hopefully that is the end of purchases!).
I am hoping to get a finished clay oven with a 43" inside cooking surface that we can pick up with a forklift and put on the back of our pig roasting trailer.
The first step was to cut a piece of steel and reinforce it with channel iron.

The next step was to lay another series of channel down for stiffening the frame in the opposite direction and to give us something to get the forklift underneath.
 After that we laid out the insulating fire bricks, which are to be the base of the oven. We then welded some angle iron on in order to hold the bricks tightly together on the top of our steel structure. I took this opportunity to shoot a little high temp engine paint on this thing so it wouldn't look quite so "rustic".
The final thing I did today was to add a fine layer of sand as a bed for our fire bricks and start the brick layout. Because our bricks are held together tightly by steel angle iron I figured it would be fine to skip the fancy patterns and just lay them seam to seam. I guess we will see how it works out.
 So that is all I have done at the moment. The next step is going to be gathering the clay and mixing it with sand to build the dome. I should be getting going with that in the next couple of days as time allows. Then on to pizza...and more importantly beer! Or wine I guess, if you know where to find any.
-Neil
1/28/2011
New Fire Ring

We decided to install a permanent fire ring at the winery! It should be a fun addition to cold day work parties and summer evenings after dark. We are also starting to get ready for Red Wine and Chocolate. That event takes place the 19th and 20th of February.
1/18/2011
Winter Work
We are back after a little time off in December and January. We have still been working but at a little bit of a slower pace. Last week we racked off our 2010 reds from the lees. The whole day went pretty well and the wine is looking good. Today I got started on some regular maintenance, cleaning barrels. We have to keep any barrels we aren't using to store wine clean, dry and sulfured. This month I went ahead and gave them a hot water rinse before sulfuring, just to be sure they are staying clean.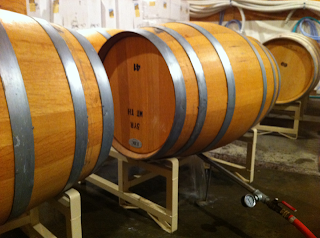 After a little bit of work at the winery in the morning I switched gears and headed out to our orchard to help out with the pruning of our Gala apple trees. Over the course of the growing season the tree tends to grow straight up, these new branches are called "suckers". We go through the orchard cut these off. We also try to do some positioning of branches through selective cuts. It is pretty mentally stimulating work actually. You are thinking about which buds to save, what branches are going to block the sun and what branches you are going to need in a year or two to keep the tree producing fruit. It's a challenge, but pretty satisfying. Below are two pictures one of an unpruned tree row and one of a pruned tree row.

Apple trees with a "haircut".

 After a little bit of work at the winery in the morning I switched gears and headed out to our orchard to help out with the pruning of our Gala apple trees. Over the course of the growing season the tree tends to grow straight up, these new branches are called "suckers". We go through the orchard cut these off. We also try to do some positioning of branches through selective cuts. It is pretty mentally stimulating work actually. You are thinking about which buds to save, what branches are going to block the sun and what branches you are going to need in a year or two to keep the tree producing fruit. It's a challenge, but pretty satisfying. Below are two pictures one of an unpruned tree row and one of a pruned tree row.
Apple trees with a "haircut".

Subscribe to:
Posts (Atom)